In English (Google) at the bottom, but here the updated post for the 14.04 and here the updated post for the 16.04
Il mio Netbook Dell Mini 9 arrancava un po' con Ubuntu 11.10 ed ha avuto i suoi bei problemi di compatibilità wireless anche con Debian 6.
Il mio Netbook Dell Mini 9 arrancava un po' con Ubuntu 11.10 ed ha avuto i suoi bei problemi di compatibilità wireless anche con Debian 6.
Quindi, invece di installare una distro più leggera preconfezionata ho deciso di fare un esperimento: installare ubuntu server ed aggiungere un'interfaccia grafica dotata esclusivamente del software a me necessario:
Chrome, thunderbird, libreoffice, wuala, skype, vlc e pidgin.
Un'interfaccia grafica per un server è sempre un qualcosa di aggiuntivo e posticcio, sono ben poche le circostanze che la rendono davvero necessaria.
Vale il vecchio adagio: "Quello che non c'è non si rompe" che, nell'Informatica, ha anche un corollario mica da poco: "quello che non c'è non può essere violato".
Ma, nel mio caso, non si tratta di costruire un server dotato di interfaccia grafica, bensì di costruire un sistema per netbook usando la versione più leggera del sistema operativo server.
L'installazione di ubuntu server va via liscia e non richiede particolari attenzioni.
Alla scelta del software da installare ho selezionato solo il server ssh perchè può sempre venir comodo.
al primo riavvio ci si trova di fronte il tradizionale prompt di login.
Conviene fare qualche operazione preliminare: abilitare tutti i repository predefiniti. E' un po' scomodo a farsi se non si è pratici del terminale, ma è un utile esercizio:
digitiamo:
sudo vim /etc/apt/sources.list
inseriamo la password e ci troviamo di fronte questa schermata:

Niente panico. Premiamo il tasto "ins" e scendiamo in basso con le freccette fino a trovare le righe che contengono i riferimenti ai repository partner ed extras. Per abilitarli basta cancellare i cancelletti iniziali delle righe deb eccetera, così ( tra l'altro le righe cambiano anche il colore ):

quindi premiamo il tasto "esc" e digitiamo ":wq"
Che significa? Significa che abbiamo appena detto al nostro programma di editing dei testi vim di scrivere le modifiche sul file w(rite) e di uscire q(uit). Affascinante programma, vim (a saperlo usare bene).
Aggiorniamo, quindi, il nostro sistema:
sudo apt-get update
e dopo il caricamento dei sorgenti software:
sudo apt-get dist-upgrade
(così aggiorniamo anche il kernel all'ultima versione, 3.2.0-24 al momento della stesura d i questo testo)
riavviamo, rientriamo con le nostre credenziali, riaggiorniamo per sicurezza il database dei sorgenti sofware con l'ormai familiare sudo apt-get update e lanciamo il programma tasksel:
sudo tasksel
Occhio, potrebbe metterci un po' prima di partire, dipende dalle prestazioni del vostro hardware.
Ci troveremo di fronte questa schermata con una lunga lista di caselle selezionabili, usate le freccette per scorrere l'intero elenco:


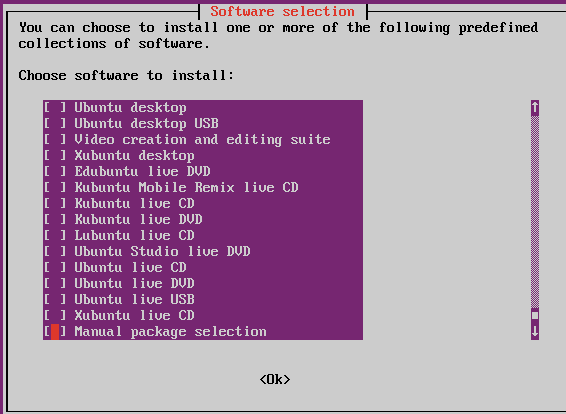

Dobbiamo selezionare (con la barra spaziatrice) esclusivamente il pacchetto Lubuntu minimal installation.
Non succede niente di male se selezionassimo Xubuntu desktop, ci ritroveremmo però Xubuntu come se l'avessimo installato dal cd con tutto il pacchetto software, il che non ci consente di raggiungere l'obiettivo.
Dopodichè, con il tasto invio iniziamo il processo di installazione la cui durata dipende dalla velocità della vostra connessione e dalla potenza della cpu.
Andate a farvi un giro.
Ah, ogni tanto tornate, ma occhio: quando l'operazione sarà conclusa non ci sarà alcun messaggio stile windows ad accogliervi, ci sarà sotto la finestra di tasksel il cursore lampeggiante e basta, attenzione a non aspettare per ore la fine di qualcosa che è già finito ;-)
Al riavvio vi troverete la schermata di accesso di lxde.
Adesso inizia il bello.
Dunque, per prima cosa, installate synaptic.
Aprite il terminale e digitate
sudo apt-get install synaptic
dopodichè sarete facilmente in grado di installare il software a voi necessario.
Siccome non è presente alcun browser, avete due scelte: installarne uno da synaptic o scaricarlo da un altro pc. Da tempo io uso chrome, quindi ho scelto la seconda strada.
Il sistema così installato è piuttosto scarno.
Se usate un portatile col wireless dovrete quasi sicuramente installare i drivers della scheda wi-fi.
Synaptic è un tool abbastanza immediato da usare: lo si lancia, si inserisce la password e si attende che il software compili il database dei pacchetti.
Dopodichè si cercano i pacchetti da installare, li si seleziona, si clicca su applica ed il gioco è fatto.
Data la peculiarità di questo esperimento vi porto i risultati della mia esperienza.
Dunque, dovete installare:
- jockey-gtk e jockey-common per poter disporre del tool di installazione dei drivers proprietari di ubuntu.
- network-manager-gnome per poter gestire la connessione LAN, il wi-fi e addirittura i modem 3g usb.
- hplip-gui se avete una stampante hp
- lxde per poter disporre dei tools di configurazione video ed audio, incluso il terminale lxterminal e l'editor di testi leafpad
Se avete voglia di gestire la faccenda via linea di comando (scelta consigliata) e synaptic NON avrete alcun bisogno di update manager e software center vari.
Ne guadagnate in leggerezza.
L'icona del gestore bluetooth potrebbe non funzionare, ma il bluetooth probabilmente funzionerà: il wizard di collegamento di un nuovo dispositivo (nel mio caso il mouse bluetooth) può essere lanciato dalla santa linea di comando con:
bluetooth-wizard
Skype, thunderbird, pidgin, chrome e libreoffice possono essere installati via repository dopo aver configurato i sorgenti software con l'ormai banale sudo leafpad /etc/apt/sources.list a cui far seguire sudo apt-get install nomepacchetto.
Tanto per fare un esempio, il repository contenente skype può essere abilitato con
sudo add-apt-repository "deb http://archive.canonical.com/ precise partner"
e skype viene installato con:
sudo apt-get update
sudo apt-get install skype
E' anche possibile installare il software mediante pacchetto .deb con
sudo dpkg - i nomepacchetto.deb
Per esempio, io preferisco installare libreoffice così perchè ottengo una installazione completa anche di parecchie estensioni.
Attenzione, Chrome, scaricato direttamente da google, potrebbe darvi errore di dipendenze non risolte, niente paura, basta usare apt per correggere il problema in automatico:
sudo apt-get -f install
Ora il mio netbook è tornato discretamente scattante, certo, stiamo puntando al 4° anno di servizio e già la macchina non è nata per essere performante in quel del 2008, ma con Linux, si sa, anche le resurrezioni sono possibili.
My Dell Mini 9 Netbook limping a little 'with Ubuntu 11.10 and has had its good compatibility issues with Debian wireless 6.
So, instead of installing a prepackaged distro lighter I decided to try an experiment: install ubuntu server and add a graphical interface with only the software I need to:
Chrome, Thunderbird, LibreOffice, Wuala, skype, pidgin and vlc.
A graphical interface for a server is always something extra and artificial, there are few circumstances that make it truly necessary.
That is the old adage: "What there is does not break," which, in computer science, also has a corollary: "what is not there can not be infringed."
But, in my case, it is not to build a server has a GUI, but to build a system for netbooks using the lighter version of the server operating system.
The installation of ubuntu server goes on smooth and does not require special attention.
The choice of software to install the ssh server I selected only because it can always be desirable.
At the first reboot you are in front of the traditional login prompt.
It should do some preliminary operation: enable all the default repository. It 'sa bituncomfortable to do if you are unfamiliar with the terminal, but is a useful exercise:
type:
sudo vim /etc/apt/sources.list
insert the password and we are faced with this screen:
Do not panic. Press the "ins" and we go down with the arrow keys until you find the lines that contain references to partners and extras repository. To enable just delete the original gates of the deb and so, so (among other lines that change the color):
then press the "esc" and type ": wq"
What does this mean? It means that we just told our vim text editing program to write the changes to the file w(rite) and exit q(uit). Fascinating program, vim (to use well know).
Update, then our system:
sudo apt-get update
and after loading the software sources:
sudo apt-get dist-upgrade
(so also update the kernel to the latest version 3.2.0-24 to the time of writing this text)
reboot, we return with our credentials, re-update the database for security source familiar with the software sudo apt-get update and launch the program tasksel:
sudo tasksel
Eye, may take a while 'before leaving, depends on the performance of your hardware.
We face this screen with a long list of selectable boxes, use the arrow keys to scroll the entire list:
As you can see there is plenty of choice and from here we can reconstruct an entire collection of downloading the desktop system packages that we like.
We need to select (with spacebar) only the package Lubuntu minimal installation.
Then, with the enter key to start the installation process whose duration depends on your connection speed and power of the cpu.
Go for a walk.
Oh, every now and come back, but watch out: when the operation is completed there will be no post-style windows to welcome you, we will be under the tasksel dialog the blinking cursor and nothing else, be careful not to wait for hours on end for something that is already finished ;-)
Upon restart you will find the login screen lxde.
Now the fun begins.
So, first, install synaptic.
Open the terminal and type
sudo apt-get install synaptic
then you will be able to easily install the software you need.
Since there is no browser, you have two choices: install or download one from synaptic from a different computer. From the time I use chrome, so I chose the latter approach.
The system as installed is pretty thin.
If you use a laptop with wireless you will almost certainly install the drivers the card wi-fi.
Synaptic is a fairly straightforward tool to use: you start it, you enter it and expects the software to compile the package database.
Then you try to install the packages, you select them, click apply and you're done.
Given the peculiarities of this experiment, I bring you the results of my experience.
Therefore, you must install:
jockey-gtk and jockey-common to have the tools to install proprietary drivers for ubuntu.
network-manager-gnome to manage the LAN connection, wi-fi and even 3g usb modems.
hplip-gui if you have a printer hp
lxde to have the tools to configure video and audio, including the terminal and text editor lxterminal leafpad
If you want to handle the matter via command line (recommended) and synaptic NOT have any need for software update manager, and various centers.
As you gain in lightness.
The icon for the bluetooth manager may not work, but the bluetooth will probably work: the wizard of connecting a new device (in my case the bluetooth mouse) can be launched from the holy command line:
bluetooth-wizard
Skype, thunderbird, pidgin, chrome and LibreOffice can be installed via the repository after you configure the software sources with the now commonplace leafpad sudo /etc/apt/ sources.list file to which to follow sudo apt-get install packagename.
As just one example, the repository containing Skype can be enabled with
sudo apt-add-repository "deb http://archive.canonical.com/ precise partners"
and skype is installed with:
sudo apt-get update
sudo apt-get install skype
It 's also possible to install the software using. Deb package with
sudo dpkg - i somepackage.deb
For example, I prefer to install LibreOffice so why even get a full install several extensions.
Warning, Chrome, downloaded directly from google, it might give you error of unresolved dependencies, do not worry, just use apt to fix the problem automatically:
sudo apt-get-f install
Now my back is fairly agile netbook, of course, we are aiming for the 4 th year of service and already the car is not born to be performing in that of 2008, but with Linux, you know, even the resurrections are possible.
Sai dirmi se installando Ubuntu con questa procedura, trattandosi della versione server, gli aggiornamenti sono supportati per 5 anni?
RispondiEliminaTe lo chiedo perché vorrei resuscitare un vecchio catorcio e se la risposta alla mia domanda fosse affermativa ci installerei un Ubuntu Server 10.04 LTS, che dovrebbe essere supportato fino al 2015 ed il cui kernel di sicuro va meglio sui pezzi da museo.
Direi proprio di sì, soprattutto perchè anche la versione desktop della 12.04 lo è. Tuttavia, in pratica, dipende dai pacchetti: lubuntu 12.04 non credo sia una LTS, mentre ubuntu e xubuntu 12.04 lo sono. In pratica installando lxde su ubuntu server 12.04 potresti trovare dei pezzi di sistema non coperti da supporto LTS, tuttavia ritengo che la cosa sia essenziale solo in ambiti specifici. Prova anche con la 12.04, non credo che sia più pesante o meno compatibile della 10.04 :)
RispondiElimina